
After an organic reaction it’s common to get a mixture of products. Usually one of them is what you want, and the other products are, well, garbage. Column chromatography is the method most commonly used to purify your product and remove undesired side products.
Contents:
- How Column Chromatography Works
- How to Run a Column
- Key Column Chromatography Concepts
- Plain English Procedure
How Column Chromatography Works
Let’s say you had a mixture of compounds A and B. How can you separate them?
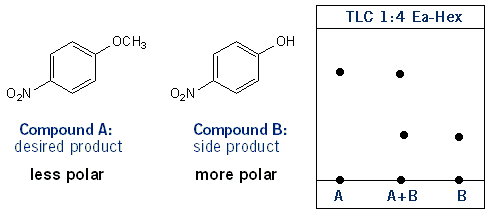
The first thing to do would be to run a TLC on the two compounds to see if they have different Rf values. If so, that means they also have different polarities; the higher the Rf value, the less polar the compound. So in this case compound A would be the less polar compound. As long as they have different polarities you can run a flash column. That is, perform column chromatography to separate the two compounds. The idea is that both columns enter the column (or tube) at the same time, but exit the columns at different times, so we can isolate them as they exit.
How to Run a Column
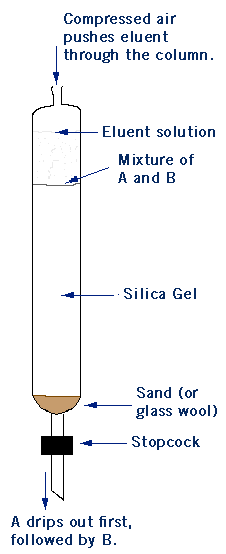
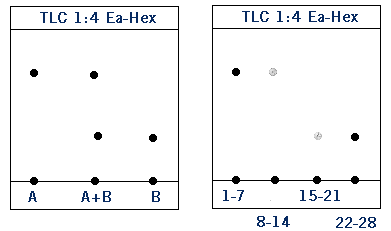
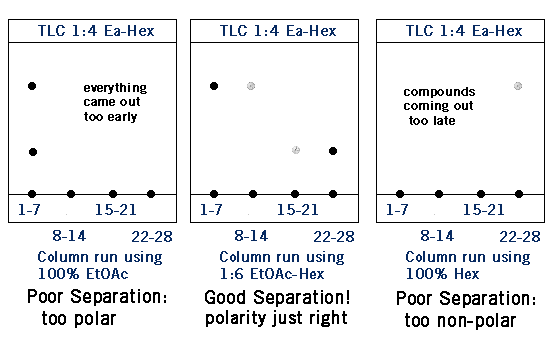
To “run a column” you dissolve your mixture of compounds A and B in an eluent solution- usually a mixture of ethyl acetate and hexanes. The eluent solution then travels through a glass tube filled with silica gel- this is your chromatography column. Silica gel is polar, so the more polar compound B will stick to the silica gel because of “like dissolves like”. Because compound A is less polar it will travel through the column faster than compound B. In technical terms, the silica gel is your stationary phase and the eluent solution is the mobile phase. More polar compound B has a higher affinity for the stationary phase than less polar compound A. The eluent solution is collected in fractions as it exits the column. So far example, the first 5 mL will be placed in test tube #1, the second 5 mL in test tube #2, and so on. This allows you to carefully separate your product using TLC analysis. In the TLCs below, fractions 1-7 contain compound A. It looks like there is some A in fractions 8-14, but not much. Compound B starts to come out around fractions 15-21, but really starts to come off the column in fractions 21-28. Notice that the less polar compound (A) came off the column first.
Collecting Your Product
Let’s say you wanted to collect compound A. Then from the TLC above, you would take the liquid contents of test tubes 1-14 and transfer them to a pre-weighed round bottom flask. You would then evaporate the liquid in that round bottom on a rotovap and afterward you’d find a white solid on the walls of the glass- this is your product. Note: It’s important to weight the round bottom flask BEFORE you transfer the liquid! This allows you to weigh your product by difference.
Key Column Chromatography Concepts
The Effect of Solvent Polarity
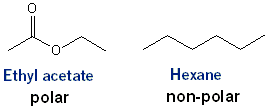
As with TLC, the more polar your solvent, the faster everything travels through your stationary phase. Much of the time you’ll be using an ethyl acetate (Ea or EtOAc) and hexane (Hex) system. The higher the percentage of ethyl acetate is the more polar your system will be. If your system is too polar your compounds might come out too quickly resulting in a poor separation- after all, if you collect everything in a few test tubes you’ll have nothing to separate. Likewise, if your system is too non-polar your column will take forever to run.
Column Eluent vs. TLC Solvent
Just a quick note- you normally don’t run your TLCs using the same EtOAc/Hex solution as you use to run the column. For example, you might use 1:6 EtOAc-hex solution to run your column, but use 1:4 EtOAc-Hex solution for your TLC plates. (This was the case in the diagram above). This is because column chromatography is better at separating molecules than TLC is; using the same polarity solvent, you’ll get a better separation with column chromatography than with TLC.
How to Tell What Compounds Will Be “More Polar” or “Less Polar”
As a general rule, a compound with a hydroxyl (–OH) group will be much more polar than one without.

The Purpose of Sand in a Column
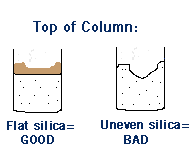
It’s good practice to put a layer of sand above and below the layer of silica gel. This is so the silica gel is level (flat). If you have ditches and mounds at the top of your silica gel you will get a poor separation because your compounds will not enter the column evenly. This is the purpose of sand. When liquid hits the sand ditches and mounds form, but the silica gel remains flat and even. (It’s OK if the sand is uneven).
Keep the Column Wet to Avoid Cracks
Once the silica gel has been soaked in eluent solution it’s important to avoid letting it run dry. You do this by making sure that the solvent level never goes below the silica gel; add more solvent as you run your column. What happens if your column runs dry? Then cracks start to form in the silica gel and you will be a poor separation.
Plain English Procedure
Sorry- this lab is a little long.

Step 1: Extract Caffeine from Tea
While one of you is doing step 1 have your partner setup step 2! In a sep funnel add ~40 mL of brewed tea and 20 mL of 5% HCl solution. You will then extract with 4 x 10 mL portions of dichloromethane (DCM). The DCM will be the lower layer. Collect the ~40 mL of DCM and dry it over sodium sulfate (to remove any water). (This step isn’t really necessary; silica gel sucks up water very well). Then transfer your DCM to a round bottom flask (RB flask) and remove solvent via rotovap. If you used sodium sulfate, you should filter the DCM through a cotton plug so the sodium sulfate gets left behind. After the evaporation you should be left with a white powder- that’s caffeine.
Step 2: Run a Column
Your text says to measure out 0.7 g of silica gel- don’t do this. Just fill up the column about ~50-60% high with silica gel. Add a layer of sand on top. You will be doing a gradient elution, meaning you will be changing the eluent solution you use (first 100% DCM, then 95:5 DCM-EtOAc, and then 100% EtOAc). Dissolve your solid caffeine in your first eluent solution (100% DCM) and run the column with a total of 15 mL of DCM, collecting ~5 mL in each test tube. Then use two 5-mL portions of 95:5 DCM-EtOAc, and then three 5-mL portions of 100% EtOAc. In the end you’ll have 8 test tube with about ~5 mL of solvent in each. Use TLC analysis to determine which fractions contain caffeine. (Your TLC solution will be provided by your TA). Finally, transfer those fractions that contain caffeine into a pre-weighed round bottom flask and evaporate the solvent using the rotovap. Weigh by difference to determine the amount of caffeine you recovered. You will probably have to let the caffeine dry in your lab drawer for a week before you can take a melting point.
